Image viewer
INSApplies to the
InSight ANM20Applies to the
Mars 2020 ANMERApplies to the
MER ANMSLApplies to the
MSL ANPHXApplies to the
PHX AN
Use the Image viewer tool to look at images in the Notebook and make annotations. For some images, measurement tools (location, distance, and profile) are available. Check out the Image viewer FAQ for answers to common questions.

 Hazcam and
  Navcam; MER
 Hazcam,
  Navcam, and
  Pancam; and Phoenix SSI images fall into this category. They also are available for most MSL Curiosity rover archive Navcam mosaics.
Getting started
The image viewer is accessed from a data product detail page by choosing Product > Image viewer from the menu bar. Once the image is loaded, use the mouse or onscreen controls to zoom and pan about the image.
Workspace
The Image viewer workspace is comprised of a Function panel on the left side and the Image panel on the right.
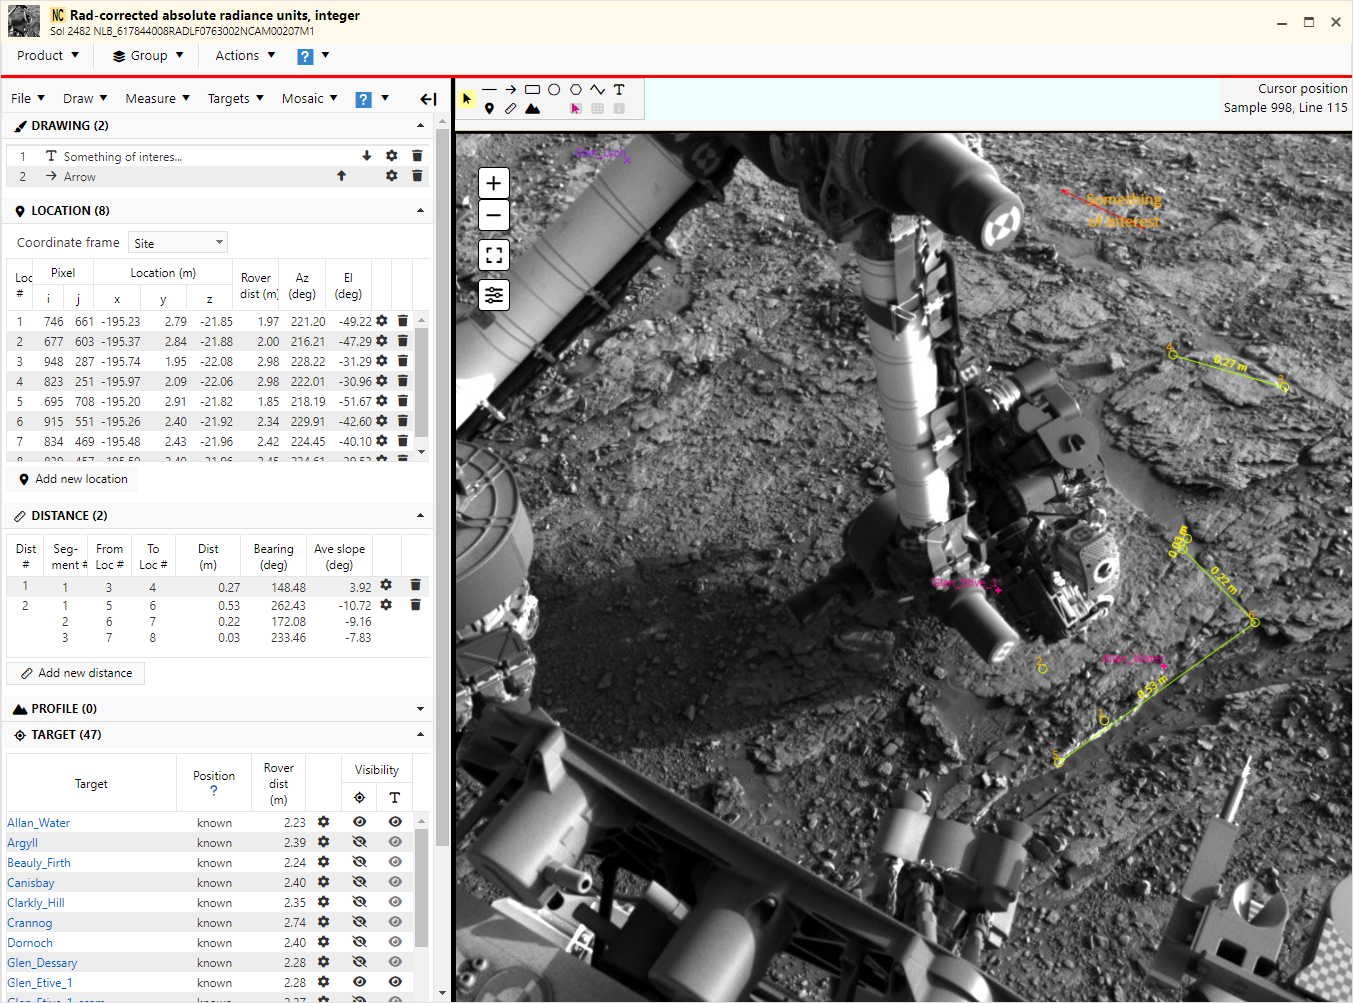
The Function panel contains a menu bar of control functions such as making measurements, adding annotations, and downloading results. The function panel also lists user-defined annotations with access to editing functions. You can hide the Function panel by clicking on the Hide button at the right side of the menu.
The Image panel contains the image that can be zoomed and panned. Above the image, a toolbox provides quick access to the tools, with usage Instructions appearing to the right of the toolbox. The cursor location within the image is shown in the upper right. When the Function panel is hidden, a Show button appears to the left of the toolbox. A summary of toolbox functions is shown below.

| Select tool | Function |
|---|---|
| Select | Select a drawing object. |
| Shape Tool | Add a new shape by selecting the shape tool and then... |
| Line Arrow |
Click at the desired start point. Then click at the desired end point to complete the shape. |
| Rectangle |
Click at the desired point for one corner. Then click at the opposite corner to complete the shape. |
| Ellipse | Define the rectangle that circumscribes the ellipse. Click at the desired point for one corner. Then click at the opposite corner to complete the shape. |
| Polygon | Click on the image to define each vertex. Right-click on the image or click the Complete button to close the polygon and complete the shape. |
| Polyline | Click on the image to define each vertex. Right-click on the image or click the Complete button to complete the shape. |
| Text | Click on the image to define the starting point. Enter the text into the dialog box and click the OK button to complete the shape. |
| Measurement Tool | Make a new measurement by selecting the measurement tool and then... |
| Location | Click the desired point on the image. |
| Distance | Click the starting point of the measurement. Left-click additional intermediate points along the path. Right-click the final point on the image or click the Complete button above the image to complete the measurement. |
| Profile | Click the starting point of the measurement. Left-click additional intermediate points along the path. Right-click the final point on the image or click the Complete button above the image to complete the measurement. |
| Mosaic Tool | Function |
| Identify | Click on a frame within the mosaic to identify the source data product. |
| Footprints | Show/hide source frame images on the mosaic. |
| Sources | Show/hide source frame data product IDs on the mosaic. |
Tools
Measurement tools
The Image viewer includes tools for finding locations in an image, as well as making measurements and viewing elevation profiles. Measurement tools are available only for images with associated XYZ data. Currently, only some MSL Hazcam and Navcam; MER Hazcam, Navcam, and Pancam; and Phoenix Stereo Surface Imager images fall into this category. Read details on using the measurement tools.
Drawing tools
The Image viewer allows you to annotate an image with a variety of shapes such as lines, arrows, ellipses, rectangles, and text. Read details on using the drawing tools.
Mosaic tools
When viewing mosaics, tools are available to identify the source images that comprise the mosaic. Read details on using the mosaic tools.
Targets
The Image viewer automatically displays targets on an image when available. Targets are categorized by how accurate their position on the image is known. (See Concepts and deep dive: Targets for additional information.) For images acquired at the same rover site and drive position as the locator image, a target's position is denoted as "known". For images acquired at other locations, the target's position is listed as "approximate". The target table column "position" reflects this categorization.
Upon initial load, targets with known locations are styled differently from auto-located images. The symbols and colors used for targets may be changed individually or as a group. In addition, the visibility of a target's symbol and label may be set, although the label cannot be displayed without it's corresponding symbol.
Saving annotations
Measurements and shapes are automatically saved when you create them. As long as you log in with the same account, your annotations will automatically be loaded the next time you open the Image viewer for the same image.
Downloading the results
Downloading the data in a spreadsheet
Choose File > Download measurement data from the menu to get an Excel workbook of measurement values. The workbook will contain a separate spreadsheet for each of these items if present:
- Locations in site frame
- Locations in rover frame
- Locations in local frame
- Distances
- Profiles
- Raw profile data (one spreadsheet for each profile)
Downloading the data as a shapefile
Choose File > Download measurement shapefile from the menu to get measurement values in shapefile format. The zip file will contain:
- .shp - shape format file
- .shx - shape index format file
- .dbf - attribute format file
- .prj - projection description file
MSLApplies to the
MSL AN For MSL, the IAU_Mars_2000 projection is used.
Downloading the annotated image
Choose File > Download annotated image from the menu to get a PNG version of the image including your annotations. A 2% linear stretch is applied to the source image and the annotations are overlaid.